Oksana Erygina
Within the framework of the month by February 23 Cossack army led by sergeant major Kovaleva A. A. spent in our kindergarten drawing competition"Cossacks on guard of the motherland". In that competition children of senior and preparatory groups took part. Rules competition: drawings are performed by various means of artistic activity, either these are colored pencils, or watercolors or gouache. There were a lot of jobs. And they are all so different. But the most important thing is that our children honor the memory of their grandfathers and great-grandfathers. The guys told interesting stories that happened in the distant war times with their ancestors Cossacks. In their drawings they tried to convey the image of the brave, brave Cossacks who defended the borders of our Motherland. Thanks to the history of our ancestors, children learn from their examples to be real citizens of our country. countries. They learn a lot of new and interesting things from life. Cossacks. Many boys now want to be like their ancestors, that is, to serve in Cossack troops.
1st place was taken by Kovalyov Vitalik
2nd place - Roman Frolov
3rd place - Anna Voronina
They received certificates of honor and prizes.
All other children were awarded with memorable gifts for participation.
Here is the award itself.
This is an exhibition of children's works


And this is Kovalyov Vitalik - the owner of 1st place!


Related publications:
I stand on guard for the Motherland. I love my country! Every year our Russia is getting more beautiful! And believe my friends, Wherever fate has thrown you, you.
In our kindergarten there was a competition of children's works "My Mom", dedicated to Mother's Day. Mom is a sweet and dear word. In all languages.
Good day, dear colleagues. There are only a few days left before the New Year. Everything is ready for the holiday: Christmas trees are decorated, walls and windows are decorated.
Children love to draw. They depict on paper everything that they feel and notice around them. The most successful examples of this creativity are parents.
Drawing competition "Kindness, Peace and Friendship" of the State Committee for Combating the Nursery - Garden "Seagull" Kalkaman village, Aksu city, Pavlodar region among the pupils of the nursery.
In our kindergarten of the village of Kopanskaya, a drawing competition "Cossack on Guard of the Motherland" was held, organized by the farm Cossack society. Guys.
Hello dear friends. On November 20, in the senior group of MBDOU d / s "Khunchugesh" a drawing competition was held on the topic "My rights are my protection."
Classics option No. 2 and 3 Variants of the game "Classics" on the street:
1. Draw a long line with chalk. The little ones can play too.
Walk the line. Don't stumble.
Jump on one leg.
Measure the number of feet.
Jump to the right, then to the left of the line. It can be on one or two legs.
2. Draw a long line and triangles adjacent to it. Jump as in option number 1.
3. Classics option number 3. Jump on two or one foot. Count your jumps out loud. Don't step on the line.
| 0 | 0 | 0 |
Rules for drawing arrows
The question of how to draw arrows in front of the eyes worries a lot of women. A beautiful arrow can be drawn only if you do it sequentially in several stages.
You need to draw an arrow with a “firm” hand, otherwise the line will turn out not to be even, but wavy, which is unacceptable. To prevent this from happening, it is necessary to put a mirror at eye level, and with the elbow of the hand that draws the eyes, rest against a hard surface.
It is not necessary to draw an arrow by closing the eye or opening it, it is inconvenient. It is best if the eye is half closed. In this case, you will immediately see how well the arrow is drawn.
No matter how wide it is planned to draw an arrow, initially it must be drawn thin, and gradually thicken if necessary.
Most women believe that the arrow should be drawn with one solid line. But in this case, it is almost impossible to draw a straight line. It is best to draw an arrow in two passes. From the inner corner to the middle, and from the middle to the outer corner.
The inner edge of the arrow should be drawn along the lash line. If space is left between the eyelashes and the eyeliner, it will look sloppy and the eyelashes will not look spectacular, even if they are very thick and beautifully made up.
The arrows on both eyes should be the same length and width. Even the slightest deviation is unacceptable, since with different arrows the eyes will look asymmetrical, even if in fact the woman does not have such a defect.
If the eye makeup includes not only arrows, but also shadows, then the arrows are drawn over the shadows.
Cartoon bag Cheese. It looks like it's drawn on paper, but it's actually a real canvas bag.
Cartoon Play Hooky bag. It looks like it's drawn on paper, but it's actually a real canvas bag.
Cartoon bags were invented by two female designers from Taiwan. In 2012, they exhibited at fashion weeks in London, Paris and Milan.
The bag has a zipper at the bottom, so its volume can be increased. It won't fit a lot, but it will fit the essentials. Ideal solution for tablet PC.
(http://multyashniesumki.ru/)
Pastel drawing - Egyptian Mau breed cat
1) In this lesson I will tell you how to draw an Egyptian Mau cat. These are very beautiful cats with large eyes of green currant or yellow-amber color. The Egyptian Mau has a wonderful and unique color. This is their distinguishing feature. For this picture, we need a pastel sheet of dark blue A4 size. With a white, well-sharpened pastel pencil, we will sketch.
2) Move on to drawing the eyes and nose. For the eyes, use green, yellow, dark orange, black pastel pencils. Gently shade the eye, make the pupil black, at the end add highlights with a white pastel pencil. For the nose, use white, pink, black, red pastel pencils. Shade lightly with a white pencil around the eyes and nose and rub with your finger. When drawing such small details, your pencils must be well sharpened!
3) Shade the ear first with a pink pastel pencil, and on top with a white pastel pencil. Rub everything with your finger. Add black shades and rub. Now sharpen a white pastel pencil well and draw white hairs with quick and light movements.
4) Shade the cat's head with a white and gray pastel pencil. Somewhere you can add a few strokes of blue. After that, rub everything with your finger.
5) We begin to clarify the details. With a white pencil, with small strokes, we imitate the growth of wool. Draw the stripes with small strokes of black.
| 0 | 0 | 0 |
Please draw me a sea
So that the quiet waves flicker,
To smells of happiness and will
My chest was filled to the brim.
Draw sand under my feet
Yellow-yellow, like a ray of sunshine.
And decorate the sky with all the clouds,
Do not draw only, please, clouds.
Draw me a kite
For the wind to play rebellious with him.
So that I, having nothing,
She continued to be kind and gentle.
Will you draw the sea and the sky for me?
And cover it with clouds?
Will you draw me an eternal summer?
And sand under bare feet?
Draw, but don't put a dot yet,
I didn't tell you the main thing
Please draw me a daughter
And draw yourself at the pier.
| 0 | 0 | 0 |
How to draw a picture with paints
Choose your watercolors. They are the easiest way to start painting a picture. They can convey all shades and give brightness when translucent. Choose whether you want to paint on wet or dry surfaces. When drawing on a wet surface, the outlines of objects are blurred, which is useful in landscape compositions or when filling vegetables and fruits in the background.
Take drawing paper - it does not swell from excess water, and the places that need to be fixed can be easily washed off with foam rubber. Position the paper at a 30-40 degree angle so that the ink flows evenly.
Make pencil sketches of the main objects. If this is a still life, then determine the location of the table or other surface and the fruit and vegetable composition. If this is a portrait, then take into account the proportions of a person, and if it is a landscape, then light sketches will be enough here - colors will play the main role. When drawing with paints, especially watercolors, consider the fact that you need to think over the shade of each stroke in advance. You can correct the error only with the help of wet foam rubber. Then, on an already well-dried surface, apply the desired strokes.
Draw the general background with foam rubber or a wide squirrel brush. When painting large areas, make sure that there is enough paint on the brush. Apply the background from a light place to a dark one. Please note that the effect of white when painting with watercolors is achieved only due to unpainted or well-washed areas. Be careful not to tear or roll the paper.
Determine the sunny side and shaded places in the picture. Based on this, sketch all the objects. Mix colors on the palette - in the picture, the overlay of color layers can lead to a simple distortion of the color of dark shades. Apply each next stroke next to the previous one with a slightly dampened brush for a smooth transition.
Pictures painted with paints have the gift of attracting more and more eyes. The unique play of shades allows you to convey everything to the smallest detail. But how exactly to draw a picture with paints? - drawing paper,
- pencil,
- eraser,
- paints.
| 0 | 0 | 0 |
How to draw a daffodil
Make pencil sketches in the middle of the sheet and arrange the individual parts. In the upper part, draw a hexagon - the basis of the flower itself. To do this, draw two equal trapeziums with a common base, and with convex parts facing on opposite sides. Draw the middle in the form of an oval and depict the stem and leaf with simple strokes.
Draw the details of the daffodil more precisely. From each vertex of the hexagon, draw straight lines converging towards the middle. These lines will be the vertical axes for the flower petals. Mark the midpoints of the lines. Now, from each vertex, draw strokes expanding to the indicated points. Next, bring the strokes to the middle of the flower already in the form of straight parallel lines.
In order to draw a daffodil, draw the flower petals with smooth lines - smooth out the main contours. Depict a slight wrapping of the petals with wavy lines located near their walls. Draw the middle of the daffodil. First, make the borders of the oval jagged with a small step. On the right side of the oval, draw a small dome, making the middle more voluminous.
Draw part of the narcissus stem in the form of a tubular arc connecting the flower itself and the straight thin stem with the wide side directed towards the petals. Draw a leaf of a plant as an elongated narrow one with a pointed top.
Sketch the flower with a simple pencil. Shade the middle of the narcissus tightly with straight thin lines radiating from the middle to the borders of the oval. On the petals, depict the rays going along the vertical middle line. Shade both the left side of the stem and the top of the daffodil leaf.

How to draw an anchor
How to draw an anchor
Draw a modern anchor design with two sharp edges at the bottom. Draw a vertical line in the middle of the sheet, slightly narrowed at the top and widened at the bottom. This will be the anchor spindle. Draw a circle around the upper border of the spindle, the so-called. eye - a place for attaching a cable or rope for raising or lowering an anchor. At the top of the vertical, draw a horizontal line - the stock. Secure the bottom of the spindle with a large tick.
Draw the individual parts of the anchor in more detail. Draw the spindle in the form of two straight lines, draw each of which below drawn in different directions, forming an anchor, its main part. This way you get two anchor horns. Line junctions should be smooth. Make each horn voluminous by adding another line that repeats the outline of the anchor. Draw lops on the tips of the horns - wide plates with sharp outer peaks. Please note that the heel of the anchor should be sharp enough.
Draw the stem in detail. From an inclined straight line at a short distance, draw another one with the same slope, but slightly convex, thus delimiting the lateral and lower parts of the stem. Connect both lines with a few vertical strokes. Now draw another sloping line repeating the outline and continue the vertical strokes at an angle of slightly more than 90 degrees. Draw a neck above the upper border of the stem - draw a small rectangle and divide it in half with a vertical line. Make the eye ring double.
Darken individual sections of the anchor: the lower part of the lop and the right horn. Shade the stem with short lines and the neck, its right side. Also darken the section of the spindle that goes along the right border of the vertical - the drawn anchor is ready.
An anchor is a special metal structure that is designed to secure the ship in one place. It has many different types, but the basis is always the same - a heavy bottom, which is fixed on a straight metal vertical. The drawn anchor is most often used as a sea symbol. - landscape sheet;
- pencil;
- eraser.
| 0 | 0 | 0 |
Love of freedom, courage, sharp mind and resourcefulness in battle - this is what distinguished the proud Ukrainian soldiers from other armies of the world, and makes them admire more than a dozen generations. Today I will tell you how to draw a Cossack. Such a drawing will be a wonderful decoration for your room, or a cool gift for the holiday, especially since it is just around the corner.
How do you like the idea to draw Taras Bulba? If you don't mind, let's get started!
How to draw a Cossack step by step
1. Imagine that you are a matchstick man, and draw a sketch of a Cossack, as shown in the figure.

2. With smooth lines, lightly pressing on the pencil, outline the contour of the Cossack's body.

3. Erase extra lines with an eraser. Draw the Cossack clothes, a stick and a saber.

4. Now draw the weapon, clearly draw the details around the belt. Take on the drawing of the face, and do not forget about the features of appearance. What is a Cossack without a mustache and a long forelock?

5. With light pencil movements, add folds to the clothes. Fade out the places where you want to show the shadow.

The brave Cossack is ready for battle!
BUT how draw a cossack easily and quickly, will tell the next video. A funny face will instantly cheer up and give a good mood to your friends.
But if the previous video is too simple for you, and you want to draw a warlike Cossack with a luxurious Cossack forelock, pipe and saber, see the next master class. A lot of details, the perfection of shapes and shadows, a fiery look and powerful strength in muscular hands - the artist turned out a very beautiful drawing. Let's try again?
And if you need create a drawing of a brave Cossack going into battle, and you are not averse to listening to a wonderful song about the Cossacks, and even learn a lot of interesting things about these valiant warriors, I invite you to watch the next video. At the same time, you will write an essay on history :) Great work! This is where one can truly say - a real artistic masterpiece ...
I hope you liked the master class, and now you can easily draw the legendary defenders of our native country - the Cossacks, and maybe pass your drawings on to those who are now defending its independence.
Unique retro photographs of the Cossacks, taken at the end of the 19th - beginning of the 20th century.
Legends were written about them, they were admired, they were worshiped, they were feared ... The Casali were a special elite caste. They have more than one successful military campaign on their account, and their way of life has always aroused increased interest. This review contains pre-revolutionary photographs depicting Cossacks and their chieftains.
1. Ataman 
Ataman of the Astrakhan Cossack army. Photo from their archive of the owner of a photo studio in the city of Astrakhan, who is the most famous photographer in Astrakhan at the end of the 19th - beginning of the 20th century.
2. Cossacks of the Life Guards 
Cossacks of the Life Guards of His Majesty's Cossack Regiment.
3. Cossack cavalry 
Cossack cavalry of the 1st Don Regiment. Vilna, 1915.
4. Cossacks of the 1st Poltava regiment 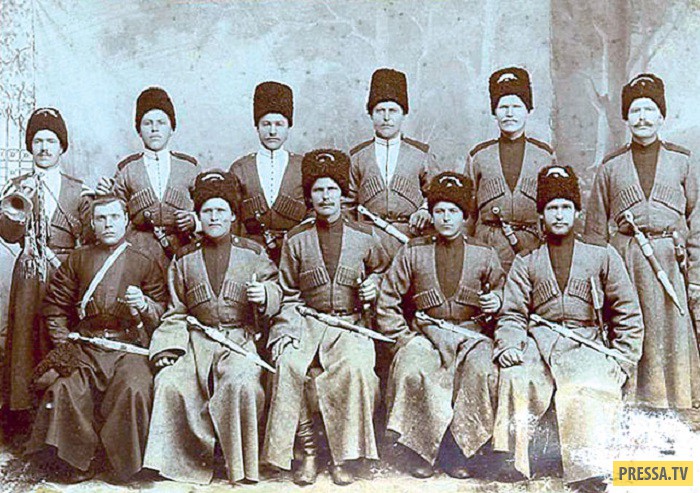
Cossacks of the 1st Poltava ataman Sidor White Regiment.
5. Parade of the Cossack regiment 
"2nd Orenburg Cossack Regiment". Warsaw, April 21, 1908.
6. Cossacks of the Khoper District 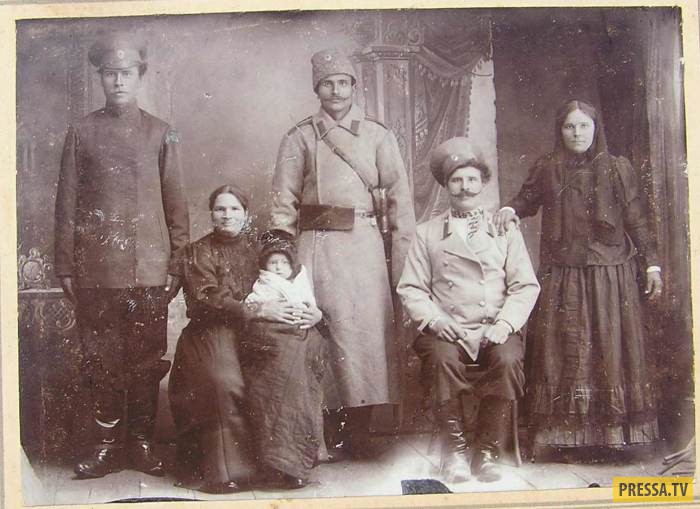
Portrait shot of the Cossacks of the Khoper district.
7. Ural Cossacks 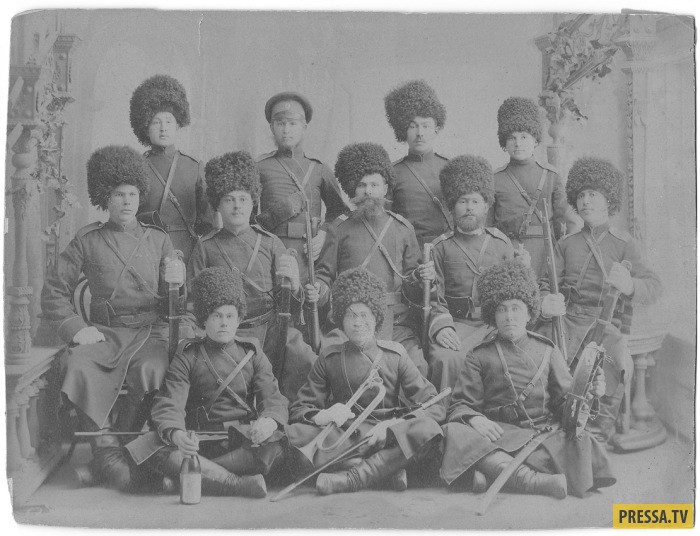
Ural Cossacks at the beginning of the 20th century.
8. Terek-Kuban Cavalry Regiment 
Terek-Kuban regiment 1904 - 1906.
9. Portrait shot of the chieftain 
Ataman Pyotr Yakovlevich Gromoslavsky.
10. Cossacks of the Life Guards Ural Cossack Hundred of His Majesty 
The Life Guards formation of the Ural Cossacks, for a permanent stay under the emperor.
11. Cossack beaters 
Beater Cossacks in one of the reserves in the Caucasus.
12. Kuban Cossacks 
Cossacks of the village of Zasovskaya, Yekaterinodar department, Kuban region.
13. Cossacks at the training camp 
Cossacks at the training camp in Maykop.
14. Cossacks of the 1st Kuban Regiment of the Kuban Cossack Host 
1st Kuban General Field Marshal Grand Duke Mikhail Nikolaevich Regiment, Kuban Cossack Army.
15. Cossacks of the 1st Ekaterinodar Regiment in the Far East 
Cossacks of the 1st Ekaterinodar Kosh Ataman Chepegi Regiment. Stanitsa Azovskaya, 1912.
Hi all! Today's drawing lesson will be dedicated to an ancient warrior, one of the most freedom-loving and free people in the turbulent times of the late Middle Ages and modern times.
Our today's guest and his compatriots united in detachments and communities, the heads of which were elected at meetings where every vote was taken into account.
Formally, not even being citizens of the state, these people forced the mighty of this world to reckon with their will - what can I say, even the monarchs were forced to listen to these brave people.
I think everyone has already guessed that we are talking about a Cossack - let's draw this brave, formidable warrior!
Step 1
Let's start, as always, with a stickman - a man made of sticks and circles, which we draw in order to indicate the character's pose, its proportions, as well as its position on a piece of paper. Of the features of the figure, we note a stocky, dense physique and short stature. Ideal proportions, according to drawing textbooks, are in accordance with the growth of the sum of the lengths of seven heads, but here the growth is somewhat lower, about six heads.
Another rule of proportions is that the arms extended at the seams reach approximately the middle of the distance from the waist to the knee. By the way, pay attention - at this stage we draw hands without brushes, so this pattern is not traced here, but this is only for now, then everything will fall into place.
But of the features, we also note the slightly curved line of the body - it is the spine, it is also the posture. This position gives the figure majesty and impressiveness.

Step 2
Let's add volume to the resulting figure, but first mark out the head. Let's draw a vertical line of facial symmetry, which should divide the face into two equal parts (although visually it should be slightly shifted to the left side of us in accordance with the slightly turned position of the head). It should intersect with three lines, above all of which there will be a line indicating the position of the eyes. Immediately below it, place short lines that will indicate the mouth.
Now let's move on to the body itself. We will not analyze in detail the process of tracing a stickman, since in our drawing there is no need for anatomically accurate drawing. This is due to the clothing of our warrior, which has a spacious, free character, hides all parts of the body, except for the head, and just a large size. We only note that the arms and torso are indicated by rectangles (the torso slightly expands towards the waist), and the legs look like a large, three-dimensional letter "L".

Step 3
Using the markup from the previous step, outline the main features of the face. The head of our Cossack should be slightly raised - nevertheless, this warrior is proud and impressive, apparently, someone close to the ataman. This elevation is expressed in the position of the ear - when the head is level, the upper tip of the ear coincides with the eyebrows, and the lower one with the tip of the nose. If you place the ear just below these frames, the head will look slightly raised. Of the features of appearance, we note the nose, which is slightly longer than average, a hanging mustache and a forelock of hair on a shaved head.

Step 4
Let's draw the face. Let's denote wrinkles - they look like slightly curved, short horizontal lines. They are located mainly in the forehead and under the lower eyelids. Also, a few wrinkles are located in the area of \u200b\u200bthe right temple from us. Draw the nostrils of a large nose, mark the broken line of the cheekbones and work on the facial hair, which is represented by a pigtail and a long mustache. And here and there, the hair should be drawn in the direction from the roots to the tips.

Step 5
Let's mark the body of our Cossack.
Let's outline the silhouettes of a fur cape on the shoulders of our Cossack, it should look like two geometric shapes - a rectangle to our left and a triangle to our right. Pay attention to the shape of these figures - they are rather sloping, as if falling from the head down to the shoulders. Then we outline with two lines running from the neck down to the belt, the unbuttoned edges of the upper part of the clothing. Draw a small inverted triangle at the top of the torso.
Let's outline with a few rough lines the contours of the belt and the weapon stuck behind it with a very long muzzle - this is exactly what the first pistols had. Yes, it doesn't look like the short spy gun we drew at all.

Step 6
We continue our step by step drawing lesson. Let's draw the details of the clothes and weapons that we outlined in the previous step. Give the sections of the cape on the shoulders uneven, “furry” edges, on the left edge of the outerwear we will draw small round buttons arranged in a vertical row. In the very center of the torso, we outline the folds on the clothes, which look like several slightly curved lines. We complete the stage by drawing an ancient weapon and a roughly tied hanging belt.

Step 7
We continue the detailing, now the right hand from us is next in line. Let's outline its outline and erase the extra guide lines from the previous steps. Despite the fact that the fabric of the sleeve, like all clothing, is very dense, the Cossack suit sits on it very spaciously. This means that there will be a very significant amount of folds.
On the right hand, which we draw in this step, the inner folds look like horizontal lines of varying intensity. Some of them go into the outer contour of the sleeve, this is especially noticeable in the area between the forearm and wrist. In the same step, we will lightly work on the contour of the left part of the shoulder cape.

Step 8
Let's work on our left hand. Just like in the previous step, we will erase the extra auxiliary lines, draw the outline of the sleeve, outline the folds. The inner ones look like smooth, slightly curved lines, while the outer folds distort the contour of the sleeve, making it more uneven.
True, in the previous step we could not see the brush - it was hidden behind the belt, but here we see the brush, it lies on a powerful staff. Draw the phalanges on all fingers, mark the nail on the big one. The hand is the most moving part of the human body, it is very difficult to draw it, so we decided to make a close-up:

And this is how it looks in general terms:

Step 9
We detail the leg left from us, more precisely, the wide trouser leg of traditional Cossack trousers - trousers, a boot and a capacious pocket fastened to the belt. The pants themselves are very spacious (like one of our previous characters from the lesson about), even baggy, so no muscles and joints need to be anatomically accurately drawn, but the folds need to be worked out properly.
Immediately under the belt we see a pocket, and we will start with it. When drawing it, pay attention to the borders of its upper part, a round button - fastener and several lines - folds coming from this button. Since we are talking about borders, we will definitely note the one that is located on the lapel of the outerwear floor. More precisely, not “that”, but “those” - there are two borders, horizontal - from below, and vertical - on the right side of us.
Now about the pants. Draw its outline, be sure to mark a sharp narrowing of the wide silhouette in the boot area, draw long, vertical folds. Note that almost all of the folds look like two closely spaced, parallel lines. Moreover, those that are located in the upper part of the leg are almost absolutely straight, and the folds in the lower leg area are located slightly obliquely.
When drawing the visible part of the boot, mark all the necessary skin folds, both internal (several oblique lines, some of them look like a check mark) and external (they form the outer contour of the boot and make it uneven).

Step 10
Our drawing is almost complete, it remains only to apply the shadows. They are very light here, not contrasting and look like areas covered with not very intense shading. We do not recommend using extreme softness, HB and B are fine. In places where the shadow is a little thicker, use a second layer of hatching laid crosswise.
It was a step-by-step drawing lesson dedicated to that. Look at our site more often, because we have many more lessons in store. See you soon!