I completely copy this topic from a topic I created on a similar resource some time ago - users of that resource took an active part in complementing my ideas, so I save some of their nicknames (where the last name and first name are not indicated) and photos of their works in compliance with the copyright right
Beads, let's share that I have found successful artistic backgrounds for photo shoots. I found a few for myself:
1. Shooting decoration on white draping fabric. For example, lay out the fabric on the table, make beautiful folds, and lay out the decoration. Satin, matte silk, and light, thin fabrics look good in the photo. Like that:

2. Shooting earrings on beautiful glasses. Well, this is already a classic :-)

The photo shows my favorite set of our beads
3. Shooting against the background thin lace. Moreover, depending on the color of the decoration, you need to apply white or black lace.

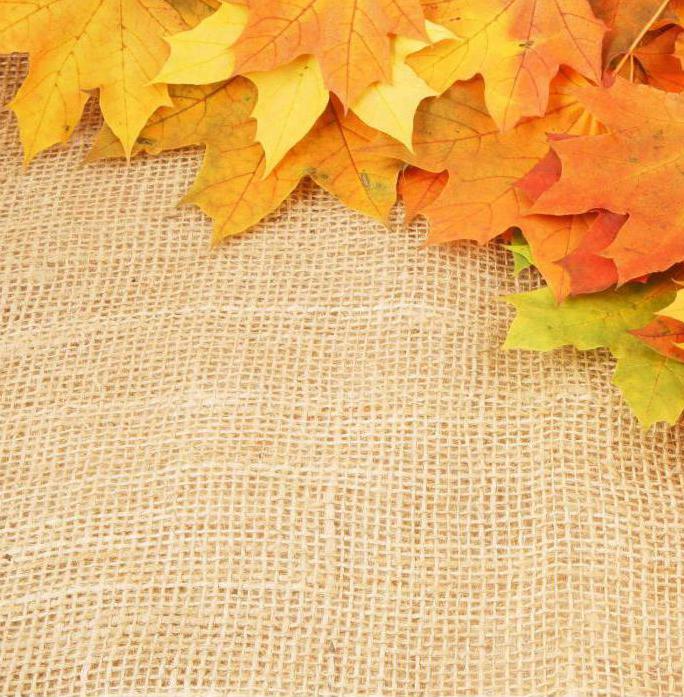
4. Dishes made from vines, rowan tassels, and yellow leaves look good in the frame and don’t “overwhelm” the decoration (but with leaves and rowan it’s easy to “translate” the eye from the decoration to the composition).

5. I almost forgot! The notes also create an excellent background. But it’s also easy to overdo them. Wow :-)

Further options were suggested by the users themselves in the comments:
6. Discreet antique items that highlight the decoration and set the accent of the composition. Thanks to Katerina Solovyova’s idea about antiques, I found a wonderful photograph. The photo shows the legs of an antique dressing table (the author’s blog contains a description of how she restored and decorated it). The truth in the photo is not jewelry, but lipstick :-)

7. Photo on the model. I liked it very much latest collection works by Ekaterina Deomidova. Photo of her Santorini necklace on a beautiful girl:

8. Tortilla gave me ideas for suede fabric and concrete flooring. If everything is more or less clear with the fabric, then upon close-up the texture of the concrete turns out to be actually interesting and looks new:

9. Evgenia Karaseva suggested taking photographs against the background of knitted fabrics. This is what Google gave me when searching for images “knitwear background”:

I think this also includes single-color coarse knitted fabrics.
10. Natalia Klarissa showed an example with old book(pictured of her work):


11. Natalia Klarissa also took stunning photos on plexiglass:

12. Pussi suggested an idea with a gray background, which will highlight and highlight any color of the product. In general, Pussi gave a lot of good advice - for which I thank her very much :-)
By the way, on the topic of gray, unbleached linen came to mind:

13. Galina Soboleva suggested ideas with bulk materials: semolina, granulated sugar, millet. I’ll also add river sand (it’s cleaner and finer than sea sand)

14. Kalena shared an example of using a lightbox. The lightbox, of course, cannot be classified as a background as such. These are the shooting conditions, rather. However, it helps to achieve best results in the photo. For those who don’t want to spend money on a purchased one, here’s a link on how to make a lightbox yourself.
15. Oksana Kosmodemyanskaya suggested using white or black watercolor paper, canvas, and thick fabric. She also presented an idea with a photo on a candlestick (in the frame is a fragment of a bronze candlestick with patina).

16. Varavina Ella suggested a great idea for photographs in the lap of nature. Look how fabulous Ekaterina Kostina’s earrings look on a tree branch:

17. The renovation prompted krot1 to realize that beautiful wallpaper could be used in the frame. So what? Now they make all sorts of embossed, expensive wallpaper - it should look luxurious in the photo and resemble brocade. I think it's a great idea :-)

18. In turn, krot1’s idea with wallpaper prompted me to think that brick, wild stone, and decorative stone tiles would look good in the photo. Something like that:

19. Pussi continues to delight us :-) Look what wonderful backgrounds she found in the outdoor shooting in the forest. I am delighted! By the way, she also sent me a wonderful background with picturesque forest moss in a personal message. So don’t neglect outdoor photographs!


20. Here comes inspiration :-) You can use shells in compositions! Large beautiful shells, like these:

I’m once again adding to our collection with excellent backgrounds suggested by you, dear beads:
21. suggested a cool idea with aged paper and English text, and also showed how notes benefit from aging. Admire how stylish it looks:


By the way, I also used the idea with dried leaves in my photos. Now is the time to collect beautiful leaves and dry them in the shade :-) In winter you will get great shots!
22. suggested photographing the products against the background of bamboo napkins. I think this is an elegant solution: the work comes to the fore, and the napkin does not “clog” the image and serves as a good interesting background :-)

23. showed a whole set of different beautiful works and backgrounds! :-) I'll add here those backgrounds that we didn't have yet. I liked the ideas with fur and crumpled paper the most - what about you?


24. shoots works on simulated felt. He also embroiders on it :-) In my opinion, it looks very noble! :-)

25. showed how beautifully photographed works on suede, linen and textured paper are:-) I would also like to mention her idea with a suede covering for gift wrapping:-)


26. suggested photographing works on gray pastel paper, or matte photo paper, because
I would like to add that in most cases a win-win- photo on medium gray paper (for pastels). On a white background, the product is darkened by the camera, and on a black background, it is highlighted. But on medium gray it’s just right, the colors are as close to the truth as possible. But a gray background does not always look good; sometimes other colors are needed.
This is what Google gave me when I searched for gray pastel paper:

27. showed interesting idea with a photo of a children's swing - look how lovely it is:

She also noted that it would be good to photograph works on pebbles - in principle, pebbles in shades of gray will perfectly set off the photo and will not “overload” and draw attention to itself - we admire:

I express my deep gratitude to everyone who helped me collect ideas :-)
If you have any other ideas, please let me know - we’ll collect all the good thoughts about backgrounds in one place :-)
If you are interested in food photography or product photography, then you are well aware that one of the most important components nice photo is correct and beautiful background. Moreover, if you use it from shot to shot, then it is the background that can become business card photographer
What background to use
For photographs, you can use light, uniform surfaces or original textured ones: you can use an antique wooden table, textured material with an original pattern, brick and even artificial marble.
It’s good if the photographer’s studio already has original textured surfaces, but if not, then how to make a photo backdrop with your own hands. Very often, photographers use artificial or real pieces of all kinds of materials. But the question of storing such items arises. However, there is another way out: you can make original photo backdrops yourself, while the financial costs will be minimal, and storing and moving them is quite simple.
How to make a photophone from wood with your own hands
Wooden backgrounds are one of the most in demand today. Most often they are used in food photography, as well as for creating photos in the flat lay style. You can make a wooden background yourself using the most ordinary boards. To emphasize texture, the finished surface can be coated acrylic paint or stain.
Preparation method
If you don’t know how to make a wooden photophone with your own hands, then you can use one of the most simple ways. To work you will need several wooden boards, liquid nails, sandpaper, special or stain.
The boards are cut according to the dimensions of the desired result; if necessary, each one must be sanded using sandpaper. You can age it as much as possible by treating its surface with a brush for

When the boards are ready, they need to be fastened. For this, it is best to use liquid nails, especially if you need to make a double-sided background. The boards are laid out next to each other, face down (you should end up with a square or rectangle). Liquid nails are applied perpendicular to the first layer and secure the second layer of boards (also perpendicular with the face up). When the liquid nails have dried, the background surface must be treated with stain.
If you have been wondering how to make a photo backdrop out of wood with your own hands, then know that your background is almost ready. At your discretion, the stain can be applied several times, allowing each layer to dry. To emphasize the texture of the surface, the boards must be thoroughly sanded with sandpaper. The double-sided background can be painted in two colors. Finally, each side is coated with matte varnish in two layers, so the surface will be protected from grease, water, etc.

How to make a concrete photophone with your own hands
A photophone is of interest to many photographers; it can be an excellent location for a wide variety of photographs. Such a background looks quite aesthetically pleasing and does not distract attention from the main model, while perfectly shading her.
It’s quite easy to make such a background at home from scrap materials. And although the word “concrete” is in the name, for such a background you only need wood putty. Additionally, “color” is useful - this is an ink of a certain color that will give the background a special shade. Suppose to make a background gray, you need to purchase putty, a spatula and black paint. When you mix white putty and black dye, you get a gray tint, which is applied to the wooden base.
Required materials and manufacturing steps
To make a concrete background for a photo, you need to prepare:
- wooden background;
- a can of wood putty;
- color scheme of the required color;
- putty knife.
When thinking about how to make a photo backdrop with your own hands, first of all you need to choose a base; for these purposes you can use sheets of chipboard, plywood, etc. Everyone chooses the dimensions independently, but the most optimal is 50x50 cm. You need to make sure that the wood is not wet , otherwise the putty will fall off. The same thing will happen if there are greasy stains on the wooden base. The background can be pre-treated with a primer - it will improve the adhesion of the putty to the background.

A second layer of putty is used to create a pattern on the background. IN in this case you can work with white putty, or dilute it with black paint to get gray shade. The background is covered with small movements, while the tree should not be visible.
When the work is completed, the background is given 5-10 minutes to dry. Then the spatula is moistened in water and passed over the surface again to form streaks on it. You shouldn’t make them too high; strokes about 0.3 cm high will be enough. The finished background is allowed to dry for about 1-2 days at room temperature.
Paper backgrounds
If we talk about paper, this is perhaps one of the most budget options. It is perfect for occasional filming and home use. If you don’t know how to make a photophone with your own hands from paper, then don’t be afraid, because it’s not as difficult as it might seem at first glance. In work, rolls of wallpaper, whatman paper, corrugated paper etc.
The paper is lightweight, easy to install, store and transport, but its main disadvantage is its lack of strength and soiling. If such a background is laid out on the floor, it will most likely be disposable, since stains and marks are very noticeable in photographs.

If you don’t know how to make a photo backdrop out of cardboard with your own hands, then you can use the most ordinary wallpaper to make a background at home. Moreover, they don’t have to be covered with anything, because today there are wallpapers on sale with a wide variety of textures and patterns that will look very beautiful in photographs. Of course, it is not advisable to purchase a whole roll for several photographs, but you can find the necessary scraps of wallpaper at home, because after renovation many people have such scraps left over.
Fabric photophone
A fabric base for the background or fabric with a pattern printed on it is used quite often. This is not surprising, since it is quite durable, can be ironed and is quite easy to transport. Moreover, the fabric base is quite easy to attach, while it looks beautiful in photographs and does not scatter or reflect light. You just need to figure out how to make a photophone from fabric with your own hands.
Simply stretch a fabric backdrop or canvas onto a wooden or metal frame, and your own portable backdrop is ready. It is best to choose a textured fabric; of course, you can also find fabric with patterns, but it is worth remembering that the background should remain a background, and the patterns should not be too noticeable (you cannot “interrupt” the subject of filming).
The disadvantage of the fabric may be its kinks and irregularities, which are not intended by the plot. The advantage is that such a photo backdrop can be of absolutely any size, and it can be mounted on a wall, gate, etc.
How to quickly make a photo backdrop: the easiest way
You don't have to make a background or fabric to get a beautiful photo. If you are interested in how to make a photo backdrop with your own hands quickly and inexpensively, then this method will be a great find for you.
Without much difficulty, you can get a background of a wide variety of colors and textures, and you can make a lot of them, since such backgrounds do not take up much space.
You just need to prepare a camera with good resolution and wait for good weather. The main task is to select the necessary textures. You can take a photograph of an old fence, a crumbling wall, a large snag, etc. In this case, the photographs should be clear, sharp and not overexposed.

And then it’s a matter of technology...
At home all that remains is to look through the photographs. You need to select only those areas in the photo that are suitable for the background. Using Photoshop, you can remove everything unnecessary (leaves, stones, etc.), and create a suitable background, using different filters, tones, contrast, etc.
The finished files just need to be taken to the printing house and printed, choosing the appropriate size for yourself. However, in order to use photobackgrounds in further work, you must use fairly thick sheets of paper for printing.
If you figure out how to make your own photo backdrop, you can end up with an impressive option. However, you need to remember that a good background and the presence of a professional camera will not become the basis for a beautiful photo. In addition, you need to follow the basic rules of photography, think through the composition and put an idea into the photo, and then the photographs will be interesting not only to you, but also to those around you.
If you look at the examples offered in the article, you will notice that there is ALWAYS some kind of background in the photo. In principle, this is clear even without the article. If we are talking about live photographs, and not about etched photographs for online stores, then the photograph always has a background. It could be the horizon, sand, asphalt or floor, but there is a background.
There is no background here:
And here it is, albeit white:

In nature, backgrounds are easier: the sky, grass and water are ours best friends! They look great in photographs. But if you are taking a photo of a house, then there are options.
What is a photophone
Photophone is a whole Instagram trend. Accounts that follow the same style look beautiful and people willingly subscribe to them. And a photo backdrop makes it easy to maintain a single style - just use the same background and all your pictures already have something in common.
White photo backdrops are used more often because:
- They are more accessible. I took a photo on the white sheets and I was done!
- They are easier to work with. Choosing a light style makes it easier to follow. The paper, the sheet, and the gray sky can be light or even almost white, so you can shoot almost anywhere, not just at home.
- Photos taken against a white background are perceived more positively. And everyone loves positivity.
Black backgrounds for photographs are also used. There are a lot of very stylish dark Instagram profiles. But it’s more difficult to work with black; you need to be able to catch the light so that there are no “black holes” and the frame looks interesting.

Why do you need a photophone?
There is only one reason: you need a photo background to make the photo more beautiful. Well, the whole account as a whole too. Because the more beautiful your account is, the more effective and faster your promotion on Instagram will be.
A photo backdrop is especially important for selling photographs. Not all of us live on the islands or rent an office in old mansions with parquet floors, marble countertops and all that. And for people to want to buy your product, it must be well photographed. And the background plays an important role here.
Imagine: you want to buy even if you really want Nice dress, which was photographed on yellowed and peeling wallpaper in some places? Most likely, you will associate the dress in such a photo with poverty and general depressive moods.
And if the same dress is photographed against a beautiful textured background (even against the background of a simple white wall!), yes beautiful hanger, but hanging a handbag next to it is a completely different mood and a different effect.

That is why not only the product itself, but also the background should be treated very carefully.
Types of photophones
I shared everything possible options into 3 groups:
- Ready-made or natural photo backgrounds. These are the kind of backgrounds that you don't need to put any extra effort into creating. Maybe you have a wooden table with a beautiful texture that would be a great backdrop. Or you have a stylish textured wall. Or you just take pictures of everything on the sheet. In fact, if you dig around, you can always find something suitable at home. Seriously. Everyone definitely has the right sheet or duvet cover!
- Handmade backgrounds. This is a background you can make yourself. Taking a few boards, nailing them together and painting them with white paint is not difficult.
- Purchased backgrounds. Demand creates supply. And for a very long time there has been a whole business direction - backgrounds for Instagram. If you're too lazy to paint the boards yourself, someone will be happy to paint them for you!
Despite the fact that a single style implies one photo background, I am of the opinion that you can and should try different variants. For a business account, variety is needed to understand what background your product looks best against and what photos your audience perceives better. For personal accounts, variety is an experience and an opportunity to take the perfect photo. You don’t know a month in advance what you will photograph and against what background it will look best.
My photophones
I have 9 photo backgrounds. I'll tell you about each in more detail.
Whatman
One of the simplest and most affordable options. Whatman paper is sold at any Komus and is inexpensive. This is a dense, large and overall good white photo backdrop.
The disadvantages include the following:
- Whatman paper is stored in a roll and curls like hell. At first you will have to press it with something around the edges;
- The roll is quite large and needs to be stored somehow so that it does not get dirty or wrinkled;
- And it gets dirty very easily! You can’t put a berry or a fatty pie on such a background. Even red manicure and cat paws leave marks on him.

This is what whatman paper looks like on Instagram:

As an alternative to whatman paper, I at one time used the “cover” of a large desk calendar. It was a rectangular page made of thick white cardboard. Essentially the same Whatman paper, but not curled.
A photo of him looks like this:

Another alternative is white plywood. You can also work successfully with it if the form is suitable. My plywood turned out to be too long, but sometimes it helped.

Provided that you need to photograph a small object (for example, jewelry), printer paper is also suitable. It is, of course, not so dense, but you can take several sheets.
White duvet cover
I don't have a white sheet. But there is a white duvet cover! I laid it right on the floor near the window. To be honest, I was too lazy to iron the “photophone.” I hoped that the wrinkles would add texture to the frame))
Overall, I didn't like this background because it was difficult to use. Spread it out on the floor, remove the excess from the frame, smooth it out, find a piece so that the hole for the blanket does not fall into the frame - very difficult.
In the photo the duvet cover looks like this:

Dishwasher lid
When a dishwasher was installed in the kitchen, the lid was removed and replaced with a countertop. For a very long time this cover lay idle on the balcony until the era of Instagram arrived. As a photo backdrop, it turned out to be a godsend!

White color. Easy to clean. The square shape helps to represent the composition of the frame (after all, Instagram frames are also square). And it's free too!
The only disadvantage of such a background is a pure white background with the absence of any texture. But this minus is not critical and relates exclusively to the human factor and personal taste.
In the photo she looks like this:

Handmade background: white boards
I made this background myself. I found a long board at the dacha, sawed it into three parts, painted it with white paint and lightly sanded it to create an “aging effect.” The background is small, but great for small items and used for a store @ stalokrasivo . I put it on the windowsill, the size matches perfectly.

In the photo it looks like this:

Sometimes boards are used in conjunction with a dishwasher lid if you need to take a larger shot and the format of the window sill does not allow this.

Photophones from the store@fon4foto
As mentioned above, photo backdrops can be purchased. From @ fon4foto I have 2 photo backdrops: a square brown one with a wood look and a long white one with a “crocodile” look. A white background is another option for a background for a window sill photo studio.

Brown background – imitation wood. It is almost impossible to understand from the photograph that these are not pieces of wood, but photo printing. The background is very light, thin and takes up little space.

The cost of a small square background including delivery to the apartment is 1000 rubles. (I received the white background as a gift. The price is valid for December 2015).
Photophone from the store@prettywoodthings
Another one of my photophones is made of wood. On one side it is light gray, on the other it is blue. The background is quite heavy, but it can be used not only as a photo backdrop, but also as a tray or even a table.


At the beginning of 2016, the cost of a double background size 60x60 with pickup was 1800 rubles. It is worth clarifying that due to its weight and dimensions, it was not very convenient to take it out yourself, but if you wish, you can cope with it.

As you can see, you can even find a background for photography at home if you look hard enough.
What kind of backgrounds do you have? Tell us in the comments :)

This article is useful not only for photographers, since we photograph any of our creativity for display on the Internet or for our portfolio. There are many simple techniques that you can use to create beautiful pictures, which means you will arouse people’s interest, because beauty always attracts.
Filter
This DIY filter option is very lightweight. You need a plastic bag (white, colored or transparent - depending on what result you need).
It’s best to take a transparent one and use markers to paint on the part that is enough to wrap around the lens. Look at the photo below.
Wrap up the package
We got this result
Reflector
A set of materials: cardboard, kitchen foil, glue and tape.
It is desirable that the foil is not too thin and has an area of 1 square meter for the same area of cardboard. Having generously coated the cardboard with glue, you place the foil on it, stretching it a little and securing it at the back with tape. This is the result you should get:
Lightbox or black tile
If you want to do a subject photo shoot, then a lightbox that you can make yourself is ideal for this. I warn you, making a photo box is a very labor-intensive process. The frame can be made of anything: cardboard, wood, plastic, iron slats. Here are some options:
You stretch perfectly white fabric or paper onto the slats. In this case, the inner front part should be without bends.
If you don’t have time for the hassle of a photobox, but you or someone you know has a black tile, that’s very cool. After all, it will serve as an ideal backdrop for product photography. And if it is glossy, it will reflect the subject, and this will add impact to your photos.
Flash diffuser
The function of the diffuser is to remove shine on the face, too sharp transitions, shadows, and also make the light softer. This useful tool is very easy to make. A piece of paper attached to the flash with a rubber band, a plastic or paper cup, a table tennis ball, even a cigarette pack can all become a diffuser.
Time lapse and kitchen timer
Mirror
In the case of this item, you do not need to make anything. Just don't forget that with a mirror you can create very original pictures. Here are some tired ideas, look at them and create new ones!


Having your own studio is the cherished dream of any photographer. Today we will tell you how to get closer to achieving it and not go broke.
What is photography impossible without?
There is a proven question with which experienced photographers confuse beginners. It goes like this: “Without what is photography impossible?” There are various answers, quite logical at first glance: “without a camera”, “without a photographer”. Only a few answer correctly: “No light.”
Indeed, it’s easy to do without a photographer by using a computer and setting a shooting program. You can also do without a camera; an example of this is the camera obscura (the predecessor of the camera) and the increasingly popular scanography. So the main thing in photography is light. And in this regard, the photographer is very dependent on the vagaries of the weather if he focuses on natural light. You can only fully control the process in the studio.
What is a photo studio
Firstly, this is a sufficient amount of usable space (preferably high ceilings - from 3.5 square meters), suitable for photo sessions and the presence of a certain minimum of professional equipment. What does it include?
Equipment
- Professional camera
Tripod
Lighting equipment
Reflectors
Nozzles
Background
Additional interior
Necessary themed accessories
Computer
The minimum required for a comfortable stay in the studio

Types of light
- Painting light. The main light source, it is the one that indicates the shape of the subject and emphasizes the details. Brighter than other types.
Fill light. Needed to soften hard shadows. Removes excessive contrast. Equipment: softbox and reflective panel.
Backlight. Separates the object from the background, creates light accents, and emphasizes texture. A hard light source located behind the model.
Background light. Works with the background, creating various lighting effects. Allows you to simulate various natural lighting effects.
Directional light. It illuminates only surfaces that face the source; the remaining parts, as a rule, are in the shadow. It shows the volume of the image well, but the shape is somewhat blurry. Gives the effect of glare and denotes sharply expressed lights and shadows.

Types of lighting schemes
Having asked the question “How to make a photo studio at home,” you need to study such an important issue as the types of lighting schemes. It is the control of light that makes a photograph a masterpiece.
It is important for a beginning photographer to master the first two schemes, after which it will not be a problem to learn how to work with other options as they become more complex (and their capabilities increase).

Option 1. Involves the use of one source (monoblock and dish) and white background.
We get clear transitions between light and shadow, that is, maximum rigidity of the picture. The model stands close to the background so that the front light source casts a dense, short shadow.

Option 2. This scheme also implies the use of one light source. Components: candy bar and white umbrella + dark background. We get depth and expressiveness. This time the model is standing some distance from the background.
Making a studio at home
Let's move on to the most interesting part of our article. To create a mini photo studio at home.

Space
As we have already said, the first and most important component of a studio is space, and you definitely can’t have too much of it.

If you have the luxury of a separate room, great! free it from furniture and everything that takes up space. More air, more light! After all, objects have the ability to absorb light. We understand that this is not always possible. Therefore, compromise options are possible.
Light
The next step is to ensure light control, regardless of the time of day or night. Natural light may also be necessary, but you should be able to completely block out natural light with a “light movement” of your hand.

Temperature
Neither heat nor cold, much less changes, will benefit professional equipment. And a model wet from sweat or shaking from the cold is not conducive to a successful photo shoot.
Soundproofing
This point is important if you are going to do video shooting in addition to photography.

Making a softbox
A softbox is a device that is placed on a light source to produce soft light without glare.

- We will need: a cardboard box, a Whatman sheet, a halogen lamp, a piece of translucent fabric, wooden slats, clothespins, wire, a cutting device, a set of nuts and bolts, a set of studs.
Components: frame (any cardboard box can be adapted. One lid is cut off. The next item is a layer that reflects. Take paper white(or foil) and carefully paste it over. Next, a light and translucent fabric is taken to create a reflective screen and the side without a cover is sealed with it.
Any softbox has a two-color case: black on the outside and metallic on the inside. The opposite side of the screen should have a hole for a lighting fixture (a halogen-type spotlight will do). You can attach it using wire
If there is a need for a large softbox, it can be made from slats and wire spokes. The frame for the screen should be significantly wider than the frame for the spotlight. A cover is pulled over the frame. Separately we tighten the walls using clothespins. To mount the softbox, you can use a microphone stand or a table lamp leg. To avoid excessive heating of the equipment, turn it on only when you are actually shooting.

When asking the question “how to equip a photo studio at home,” it is important to take everything into account. But this is impossible, so we take into account the essentials, the rest is purchased as needed. In addition to the equipment that we talked about at the very beginning of the article, you cannot do without: a beauty dish, reflectors, an umbrella, reflectors, color filters, tubes, honeycombs.
Background reflector

The function of the background reflector is to uniformly illuminate the background. It provides the hard light necessary for any shooting.
The beauty dish is placed in front of the subject. Thanks to it, the photographer receives soft, concentrated light, complemented by diffused light. This is why you need a softbox with an umbrella.

The lamp is placed directly behind it or used as a reflector (if a white cloth is placed on the inner surface). Today, the softbox remains the most common attachment.
Softboxes are divided into octagonal ones (octobox), which are great for group shots, and long rectangular ones (streepbox), which are suitable for shooting portraits and if you are going to shoot full-length models.
Using a sync cable. This method causes inconvenience because it gets underfoot.
After synchronization, switch the camera to manual mode. We measure exposure using a histogram or flash meter.

Conclusions on the topic
As you probably understand, it is problematic to cover such a broad topic as “Photography studio at home using improvised means” within one article. We talked about the main components of a studio, the role of light, what color schemes you initially need to know, how to make a softbox and how to inexpensively furnish your studio.
Sooner or later, there will be a return on the effort and money invested, and you will gratefully remember the day when you decided to take the first step in this matter. We wish you good luck in your endeavors and thank you for your attention to our portal. You can also find other articles on photography on the site.